Using Tutorials
Localization
ThunderFire UX Tool's Localization supports two categories: UX Image and UX Text.
- UX Image: localization of UXImage.
- UX Text: including the localization of UXText and UXTextMeshPro, the operation is similar, the screenshot of this manual takes UXText as an example.
UX Text includes two text types: Static text types and Dynamic text types, which are marked in the subheadings in this manual.
Localization Overview
Configure Localization Language and Path
Click on the menu [ThunderFireUXTool->Localization->Setting] to open the following window:
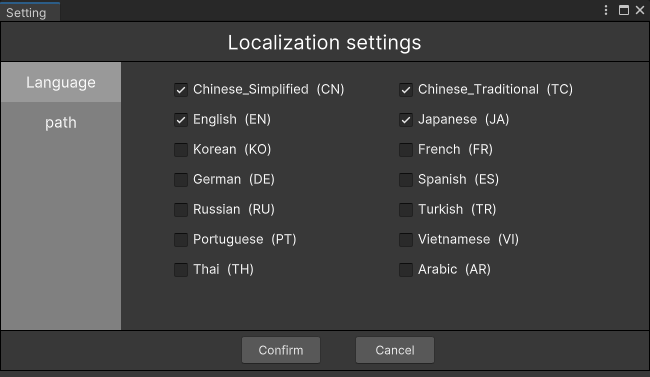
In the "Language" column you can check all the languages supported by the game, which includes 14 languages in total.

In the "Path" column, you can set the localization folder, the path of the static text table, and the path of the dynamic text table.The localization folder must be located in a path that can be loaded when running play mode (such as the Resources folder), and all three paths must be located in the "Assets/" directory.
The localization folder stores all localized image resources and JSON files converted from the text table, named TextLocalization.json.
- The path of the static table is used for localizing static texts and is in the ".xlsx" format.
- The path of the dynamic table is used for localizing dynamic texts and is also in the ".xlsx" format.
If there is no static text table, click the [Create Empty Static Table] button, select a path in the popup window, and click "Save" to generate an empty static table. It includes keys, paths, source texts, and translations in different languages.
If there is no dynamic text table, click the [Create Empty Dynamic Table] button, select a path in the popup window, and click "Save" to generate an empty dynamic table. It includes keys and translations in different languages.
After setting the above content, click "Confirm" to make the settings effective.
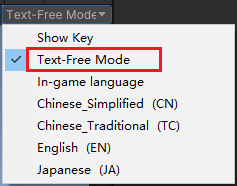
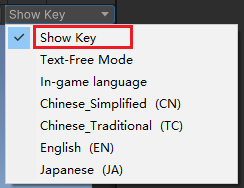
Preview Language Switching In Play Mode
When running play mode, you can set the preview language in the top right corner of Game (this will not affect in-game settings). The preview language will switch all UXImage, UXText, and UXTextMeshPro with enabled localization to the corresponding language.

Click "In-game language" means that the preview language will not be used and the in-game settings will be applied. The default setting for the in-game language is "Not set". When the "In-Game language" is clicked while this setting is active, the program will not respond, and users will need to set the in-game language using the code (see Program Interface).
UX Image
Enable Localization
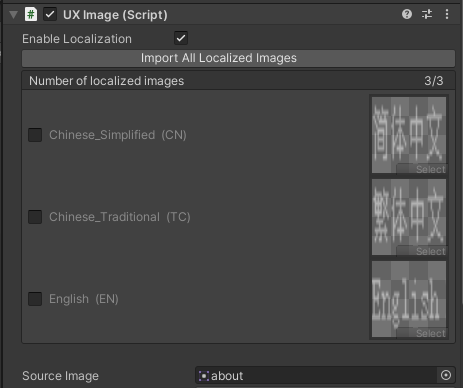
Select the UXImage that needs to be localized and Enable Localization in the Inspector.

After enabled:
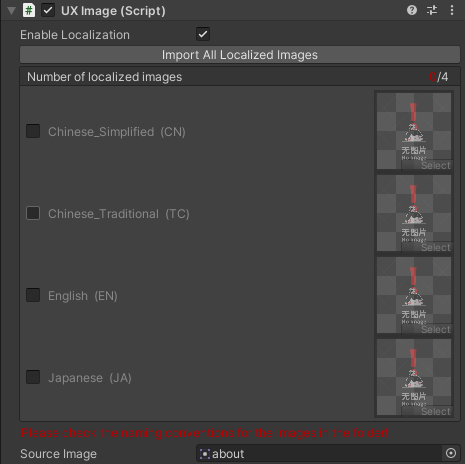
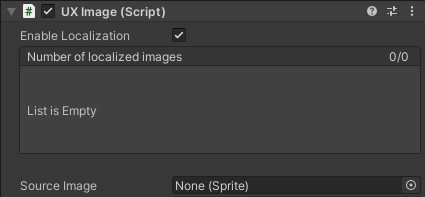
Specifically, if the Source Image is empty, the "Import All Localized Images" button will not be displayed, and the list of localized graphics will also be empty.
Import Images In All Languages
Clicking the "Import All Localized Images" button and selecting the folder that contains the localized images for the current Source Image will import the localized images and display them in the Inspector's list of localized graphics.
Notes:
- The folder where the localized images are located does not have to be in the "Assets/" directory.
- The program will recursively search for all files within the selected folder.
- The image should be named as "original image name_language suffix", with the extension ".png".
- The path to import is "localization folder/language suffix/image full name". If there is already an image with the same name in that path, it will be overwritten.
- If the "Automatically Convert Texture to Sprite" option is selected in the UX tool's "Feature Switch" settings, the imported image will be automatically converted to the Sprite.

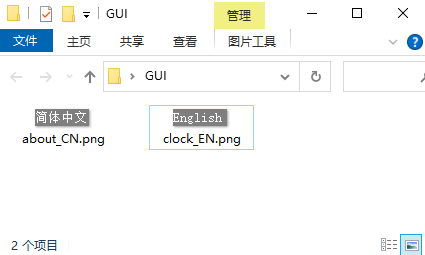
Selected folder:
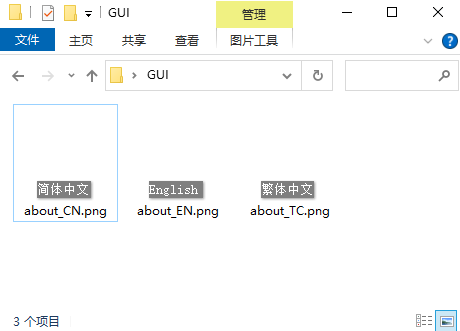
After importing:
In the example above, the program will recognize files named "about_CN.png", "about_TC.png", and "about_EN.png" in order and import them to the paths "localized folder/CN/about_CN.png", "localized folder/TC/about_TC.png", and "localized folder/EN/about_EN.png", respectively.
If a certain language's image is missing, a placeholder image will be used instead.

Batch Importing Images
Click on the menu [ThunderFireUXTool-> Localization -> Import Localization Images] and select the localization images folder, you can import images in bulk.
Notes:
- The folder containing the localized images does not have to be in the "Assets/" directory.
- The program will recursively search for all files within the selected folder.
- The image should be named as "original image name_language suffix", with the extension ".png".
- The path to import is "localization folder/language suffix/image full name". If there is already an image with the same name in that path, it will be overwritten.
- If the "Automatically Convert Texture to Sprite" option is selected in the UX tool's "Feature Switch" settings, the imported image will be automatically converted to the Sprite.
For example, import the following folders:
The program will import "about_CN.png" into the path "localized folder/CN/about_CN.png" and "clock_EN.png" into the path "localized folder/EN/clock_EN.png".
Automatic Recognition Of Source Image Modifications
When the Source Image is changed in the Inspector, the list of localized graphics will also be automatically updated.
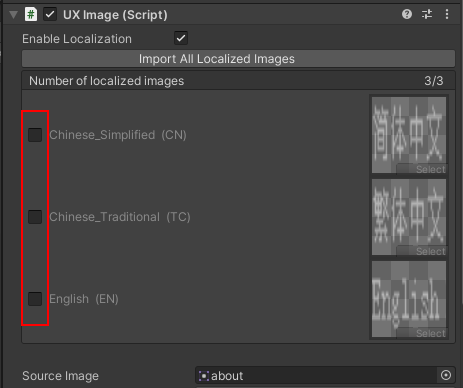
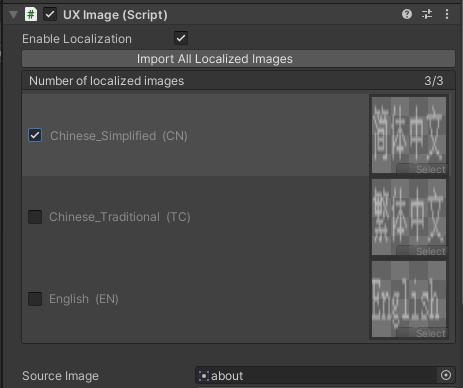
Preview Images In Different Languages
In the localized graphics list in the Inspector, selecting a specific language will allow you to preview the image in that language in the Scene. The preview does not modify the original file.
After selected:
In the Scene:
Note: This feature will automatically set the current object to be invisible in the Hierarchy. If there are overlapping images, please check if  is open in Scene.
UX Text
Enable localization
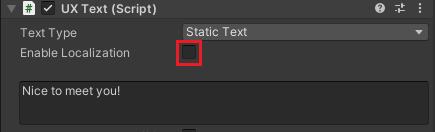
Select the UXText or UXTextMeshPro that needs to be localized and Enable Localization in Inspector.
After enabled:

Static Text
Static text is text that is created and edited directly in the Scene or Prefab, and can be previewed directly at play mode. To change the text type to "Static Text" and configure the text content:
Fill in the content to be translated
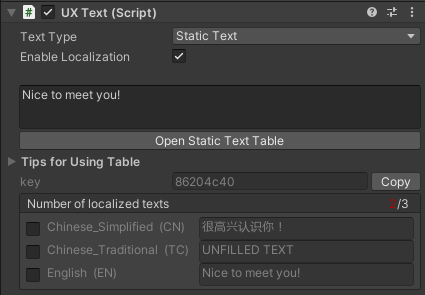
Click on "Open Static Text Table" will record the UXText and UXTextMeshPro information with localization enabled in the current Prefab to the table, and open the table. If the table does not exist, a window to create a new table will pop up.
When opened:

Fill in the translation data (multiple rows of data in one cell are supported).

Save and close the table, and then click on the menu [ThunderFireUXTool -> Localization -> Convert Text Table to JSON]. You can then view the effect in the localization text list in the Inspector.

If a language is not filled with translation data, "No text filled" will be displayed.
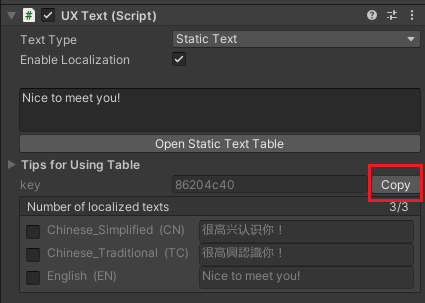
Generate Key Value
For static text types, the key value is automatically generated. When UXText or UXTextMeshPro is first selected for "Enable Localization," a unique key value is generated for it. When the original text is changed, a new unique key value will be generated.
Copy Key Value
Click the "Copy" button to copy the key value to the clipboard for quick positioning in the table.
Path Information
The second column of the static text table is used to record the path information of the corresponding object, which consists of the file name + level name. When the same object has multiple instances in different Prefabs, the path information will record all these paths, separated by "&&".
Stnchronize Table
Click on the menu "ThunderFireUXTool -> Localization -> Refresh Runtime-Use Text Table" to manually synchronize the static text table. Manual synchronization will use the information from all UXText and UXTextMeshPro that have localization enabled and text type set as static text in all prefabs.
Also, when saving a prefab, the information from all UXText and UXTextMeshPro that have localization enabled and text type set as static text in the current prefab will be automatically synchronized.
User Data Protection
When synchronizing the table, the translated data that has already been filled in by the user will be automatically preserved, even if the corresponding object no longer exists (in this case, the path and source text will be empty).
Exception Information
There are two cases where the program will output an exception message.
- An error is reported when the program tries to write to a table but the table is already open.
- When two objects have the same key value, but the source text is different, a warning will be reported (usually this situation is unlikely to occur).
Dynamic Text
Dynamic text is text that is generated in real time when running play mode or edited by the program in code, ThunderFire UX Tool provides a localized preview of such text. Change the text type to "Dynamic Text", and then configure the text content as follows:
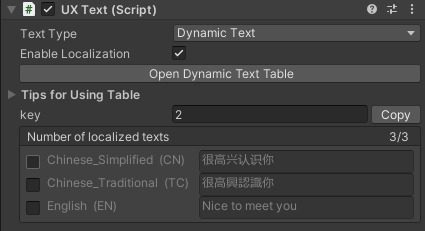
Fill In The Key Value
Clicking on "Open Dynamic Table" will open the form according to the "Dynamic Table Path" in the localization settings. If the table does not exist, a window will pop up to create a new table.
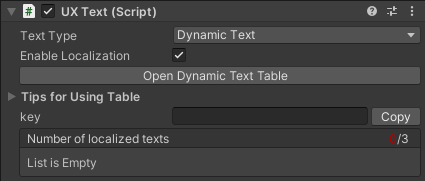
When opened:

Find the required key value and fill it into the Inspector.
If the localized text list is empty, click on the menu [ThunderFireUXTool -> Localization -> Convert Text Table to JSON] to convert the text table to a JSON file.
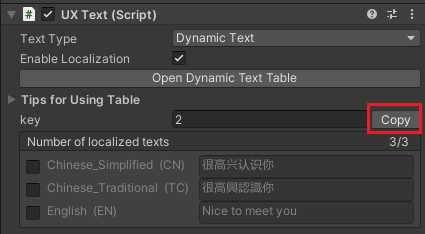
Copy Key Value
Click the "Copy" button to copy the key value to the clipboard for quick positioning in the table.
Automatic Recognition Of Key Value Changes
The localized text list is automatically updated when the key value in the Inspector changes.
Convert Text Tables To JSON
Click on the menu [ThunderFireUXTool-> Localization -> Convert Text Table to JSON] to convert static table and dynamic table to a JSON file with the file path "Localization folder/TextLocalization.json".
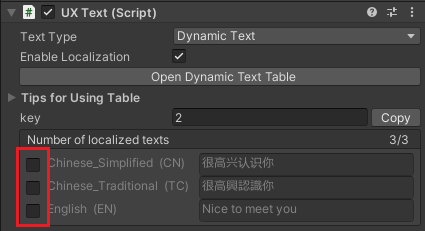
Preview Of Text In Different Languages
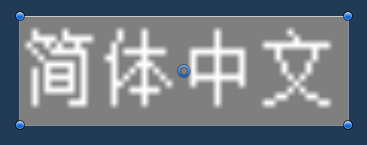
In the Inspector's localized text list, select a language to preview the text in that language in Scene, where the preview does not modify the original file.
After selected:

In the Scene:
Note: This feature will automatically set the current object to be invisible in the Hierarchy. If there are overlapping images, please check if  is open in Scene.
Text-Free Mode
The text-free mode can be set in the upper right corner of the Game at play mode, which will replace all UXText and UXTextMeshPro with box placeholders.
After replaced:

Show key
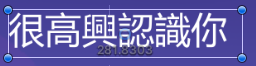
When running play mode, you can set the display key mode in the upper right corner of the Game, which will replace all localized UXText and UXTextMeshPro with their corresponding key values.
After replaced:

Program Interface
Function
// Description: You can switch the in-game language
// Class:LocalizationHelper
// Parameters:
//     type: the language type after switching
// Return value: None
public static void SetLanguage(LocalizationHelper.LanguageType type)
