マニュアル
Hierarchy Manage
The Hierarchy Manage in ThunderFire UX Tool is designed to visually manage the hierarchy of Prefabs in a project. There are certain problems with the current hierarchy management system, which include:
-
Extremely complex interface hierarchies when the number of interfaces is too large.
-
Difficulties in communication between management personnel.
This tool hopes to solve the above problems through visual expression, thereby reducing management costs. Based on this expectation, the tool mainly includes the following functions.
How to use
Open via menu Select [ThunderFireUXTool->Hierarchy Manage] in the menu.
Hierarchy Panel Structure
As shown in the figure below, the Hierarchy Manage is structured into 3 layers: the first-level channels represented by "HUD, Interface, and Pop-up," the second-level hierarchy represented by numbers, and the third-level Prefabs represented by gray squares. The number of channels and the number of hierarchies within each channel will be controlled by the program code (see the program interface below for reference).
The first level channels divide all hierarchies into major categories, with the number of hierarchies per category set by the project, defaulting to three: "HUD," "Interface," and "Pop-up." If adjustments are needed, the program development team can modify the code.
The second level hierarchies indicate the hierarchical rendering relationship at play mode, the larger the number the closer to the top (the project can be redefined), by default a channel has 10 layers.
The third level prefabs corresponds to the Prefab in the project, and is rendered based on their hierarchy. Among Prefabs in the same hierarchy, those loaded later are closer to the top.
Prefab tab information The tabs in Prefab are intended to keep track of the associated Prefab for easy management later. After the tags are added, fixed data is generated indicating the position of the current Prefab among all Prefabs with the same tag.Different tags can have different colors, which are configured in the HierarchyManagementSetting.asset file. If this is the first time a tag is added, it will default to black.
Note: This data does not change with the change of Prefab hierarchy. This is to remind users that tag order is predetermined and cannot be changed casually, so as to correspondingly change the Prefabs that come before or after this Prefab.

Interface functions
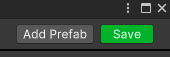
Add Prefab
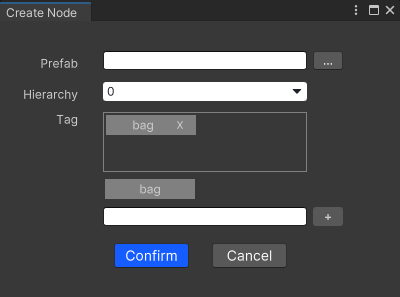
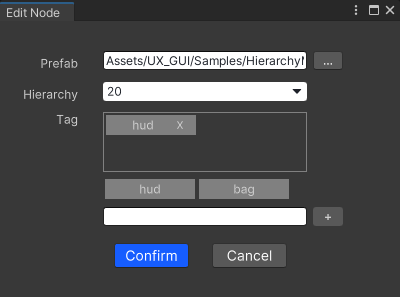
Click "Add Prefab" in the top right corner of the window to bring up the Add window. You can select a prefab by path and choose an existing hierarchy to place it in and click "Save" to save.
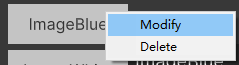
Modify And Delete Prefabs
- Modify: Right-click on the Prefab and select Modify to bring up a modification window similar to Add.
- Delete: Right click on the Prefab and select Delete to delete the Prefab from the management window.
Add And Delete Tags
-
Add: In the modify or add window, there is a tag editing section. Enter the desired text in the text box and click the "+" button. The new tag will be displayed in the upper box area, and the two most recently added tags will be displayed in the middle area. Clicking on either of these will add them directly to the tag list.
-
Delete: Click "×" in the box line area to delete it.
Note: Remember to click "OK" after making any changes to save them.
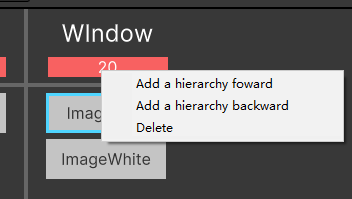
Add And Delete Hierarchies
Right-click on a hierarchy to add a new hierarchy in front of or behind it. You cannot add more hierarchies than the maximum allowed for that channel, and you will receive a prompt if you try. Click "Delete" to remove a hierarchy that does not contain a Prefab. You cannot delete the last hierarchy in a channel if it contains only one hierarchy.
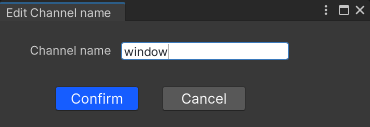
Edit Channel Name
[Right-click] the channel name, select "Edit Channel Name", and then modify it in the pop-up window.

Drag The Prefab
After selecting a Prefab, you can drag it to move it to a different hierarchy. The hierarchy you're dragging it to will be highlighted, and you can release the mouse button to complete the move.

Prefab Relationship Indication
When you select a Prefab, it will be outlined in blue, and the related Prefabs will be highlighted and connected in sequence according to their tag values. (Related means that they have the same tags as the selected Prefab or they have the same Prefab as other Prefabs related to the selected Prefab by having the same tags, this can be thought of as a grid expanding).

Quick search (Fuzzy Search)
Enter the search content in the search box (only English search is supported in the 2019 version). If there are search results, the nearest (forward) Prefab to the currently selected Prefab will be selected and highlighted. The search box will display "Current Number/Total Number" or "No Results". Click "<" or ">" to select a Prefab forward or backward, and automatically switch the view to the vicinity of the selected Prefab.

Save Information
Click Save in the upper right corner to save the tag information, Prefab information, channel name, hierarchy level, and other modifiable information on the interface.

If changes have been made on the page but not saved before closing, a prompt box will pop up.
Note: If you directly click the "×" in the upper right corner of the pop-up window, the changes will not be saved and the management tool will be closed.

Prefab Preview
When the mouse moves over a Prefab, a tooltip will display the name, tabs, and thumbnail images of the Prefab.

Program Interface
Variables
// delegate with string as reference and int as return value (used to describe the method of getting index value by guid)
// Class:HierarchyManagementOutSetting
public delegate int GetIndex(string guid);
Functions
// Description: Serialize the initial value of the Hierarchy Management tool
// Class:HierarchyManagementOutSetting
// Parameters:
//     guids:list of guids to be serialized
//     getIndex:a delegate to get the index value by guid
// Return value: none
public void CreateGuidList(List<string> guids, GetIndex getIndex)

// Description: Set the number of channels, the number of levels of each channel
// Class:HierarchyManagementSetting
// Parameters:
//     levelRange:number of levels on each channel
//     maxChannelNum:aximum number of channels
// Return value: none
public void SetInitChannelAndLevel(int levelRange,int maxChannelNum)

// Description: Set the callback after saving data
// Class:HierarchyManagementSetting
// Parameters:
//     action:a method with the parameters List<GuidWithIndex>, the list parameter represents the saved data
// Return value: none
public void SetAfterSubmit(Action<List<GuidWithIndex>> action)
Others
// Description: For a Prefab storage method
// Class: HierarchyManagementSetting
public class GuidWithIndex
{
    // Prefab name
    public string Name;
    // Prefab in the hierarchy of the serial number
    public int Index;
    // Prefab's Guid
    public string Guid;
    // Prefab contains the tags
    public List<TagDetail> Tags = new List<TagDetail>();
}

// Description: The properties of the tags
// Class: HierarchyManagementSetting
public class TagDetail
{
    // Tag name
    public string Name;
    // Tag serial number
    public int Num;
}
